Mini-Golf Masters
Use area and perimeter to design and calculate cost for a miniature golf hole
Task
Entrepreneurs in your town are considering opening a miniature golf course and need help designing a fun and creative course and estimating the cost of materials.
Students will use a grid to design an individual hole, calculating the amount of turf needed to cover the green (area) and the amount of wood or brick needed to frame it (perimeter).
Students will combine their individual designs into several 9-hole course designs and design a pitch showcasing the cost investment and benefits of their designs.
Engage
On chart paper or a digital whiteboard, preview key concepts: area, perimeter, and units. You might choose to use a geoboard for a quick way to make a range of shapes and calculate area and perimeter. Give students time to play with grid paper or tiles and talk through how counting squares helps determine area, while tracing the outside helps determine perimeter. Keep it light, curious, and hands-on as students warm up to the idea that math is a design tool, not just numbers on a page.
Once students have had a chance to practice their perimeter and area skills, let them know that they will apply what they have learned to design and estimate costs for a miniature golf course. While it should be easy to hook them, you may want to:
- Invite the owner of a local mini-golf course to speak in your class.
- Have students recall their favorite mini-golf experiences.
- Watch videos of mini-golf masters.
- Explore images of top mini-golf courses.
Discuss how entrepreneurs, builders, and contractors rely on perimeter and area measurements to order the correct amount of materials for a job. Be sure to emphasize that if their measurements and calculations aren't correct, they lose time and money.
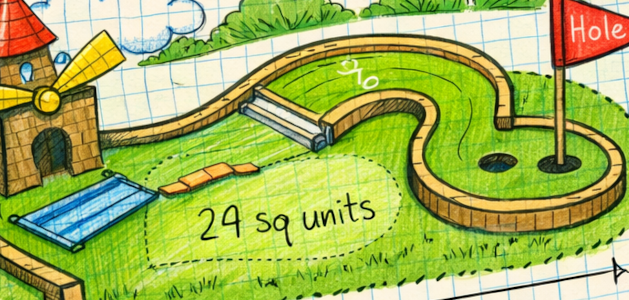
Clarify that in their designs students can't create just anything — like any real world design there are parameters. Greens on this course can only be designed using horizontal and perpendicular lines (so they can easily calculate perimeter and area). They will be able to, however, put creative obstacles inside the green.
Create
Design individual holes
Now it's time to move from dreaming to designing. Let students know they will each create one unique and amazing mini-golf hole design and that you will combine them into courses at the end.
Share your requirements for their designs, such as:
- a defined green made of connected squares.
- a clear start and hole location.
- obstacles such as themed decorations.
- clearly labeled measurements.
Give each student clean sheets of grid paper or use the grids in design tool like Wixie or Canva.
Have students outline or fill in squares to design the shape of the green. Students can draw or add stickers for obstacles in the greens.
When designs are complete, have students add measurements. They can then use these measurements to calculate perimeter to see how much wood they would need to frame the hole and find the area to estimate the amount of turf they would order.
Provide prices for wood/brick and turf so that students can also calculate the amount of money need to purchase materials to build their hole.
Provide feedback and revise
Now it's time for some peer reviews and feedback. Depending on the time you have, put students in pairs or divide the class in half and provide time for them to walk through the designs (and then switch).
Students should talk through designs and choices and review each other's calculations. Have students share warm (what they liked) and cool (what could be improved) feedback for each design. Students can leave sticky notes for each design or the presenter can keep track on a warm/cool feedback form.

Download a Warm and Cool Feedback sheet page
Provide time for students to revise to revise their designs and make sure everything lines up visually and mathematically.
Create courses from individual holes
While individual hole designs make this project reasonable to complete in the classroom, an entrepreneur needs a completed course.
Depending on the number of students in your class, work to combine holes in to two or three sample courses. While you could simply divide the class into groups to combine, ask students how they might be combined.
Your class may decide to create courses based on theme, cost, or even friendship. It doesn't really matter how, but this may factor in to how they choose to present the entire course design.
If you are using a digital tool like Wixie, it is easy to group individual student work on an assignment together using the Project Wizard.
Prepare course presentations
When holes have been grouped into courses, provide time for each student and team to consider how they will articulate the benefits of their course design as well as the total cost of materials to build it.
Share
Invite local business owners, especially if you have a mini-golf course in your community, to view and evaluate individual student designs to add motivation and give purpose to student work. Be sure to have students share the cost of goods necessary to build their hole as well as justification for why the investment is worth the result.
Print and showcase students designs in a gallery in your classroom, school classroom, or media center. Provide sticky notes for viewers to share their thoughts. Host a parent and community night so students can show off their work.
As a class determine the top nine holes, or group student work together in nine-hole sets to provide a how-to manual for potential entrepreneurs. Including cost of goods to build each hole makes this an even more valuable asset.
Assessment
Throughout the process, check in as students sketch, count squares, and label measurements. Look for evidence that students can:
- Correctly determine area using square units.
- Accurately calculate perimeter and label units.
- Represent measurements clearly and neatly on a grid.
- Communicate design choices and math reasoning in writing, narration, or presentation.
The final project demonstrates not only creativity, but also understanding of how math supports real-world design decisions. If you are sharing a rubric, you might include categories for mathematical accuracy, clarity of representation, creativity, and communication.
Resources
Marilyn Burns. Spaghetti and Meatballs for All! ISBN: 0545044456
David A. Adler. Perimeter, Area, and Volume: A Monster Book of Dimensions! ISBN: 0823427633
Cindy Neuschwander. Sir Cumference and the First Round Table. ISBN: 9781570911521
Trip Advisor - Mini Golf in United States (lots of pictures)
Standards
Common Core Anchor Standards for Mathematics - Grades 3 and 4
CCSS.MATH.CONTENT.3.MD.C.5–7
Understand and find area; relate area to multiplication and addition.
CCSS.MATH.CONTENT.3.MD.D.8
Solve real-world and mathematical problems involving perimeters of polygons.
CCSS.MATH.CONTENT.4.MD.A.3
Apply area and perimeter formulas for rectangles in real-world situations.
CCSS.MATH.CONTENT.4.G.A.1
Draw and identify lines and angles, classify shapes by properties (if used in design conversations).
ISTE Standards for Students:
4. Innovative Designer
Students use a variety of technologies within a design process to identify and solve problems by creating new, useful or imaginative solutions. Students:
a. know and use a deliberate design process for generating ideas, testing theories, creating innovative artifacts or solving authentic problems.
6. Creative Communicator
Students communicate clearly and express themselves creatively for a variety of purposes using the platforms, tools, styles, formats and digital media appropriate to their goals. Students:
a. choose the appropriate platforms and tools for meeting the desired objectives of their creation or communication.
b. create original works or responsibly re-purpose or remix digital resources into new creations.
d. publish or present content that customizes the message and medium for their intended audiences.

Melinda Kolk is the Editor of Creative Educator and the author of Teaching with Clay Animation. She has been helping educators implement project-based learning and creative technologies like clay animation into classroom teaching and learning for the past 15 years.